

Key Takeaways
- Many aging-in-place modifications are achievable as DIY projects with modest budgets.
- Bathrooms and entryways are the highest-priority areas to address for fall prevention.
- Some structural changes — like doorway widening — may require permits or professional help.
- Planning modifications before they're urgently needed leads to better, less costly outcomes.
- Universal design improvements often increase comfort and home value for all residents.
Why Aging-in-Place Planning Matters Now
The goal of aging-in-place design is straightforward: modify your home so it continues to support safe, independent living as your physical needs evolve. Yet most homes are built with no particular thought given to future mobility changes — leaving steep bathtub ledges, narrow doorways, and dim hallways as the default.
The good news is that many of the most effective modifications are achievable at modest cost, and some are genuine DIY projects. Others — particularly those involving structure, electrical systems, or plumbing — call for professional hands. Understanding which is which is the first step. Our guide on deciding between DIY and hiring a contractor offers a useful framework for making that call. The modifications below are organized from most accessible to more involved, covering the areas that tend to have the greatest safety impact.
Plan Ahead — Before It's Urgent
The best time to assess your home for aging-in-place modifications is before any mobility change makes them urgent. Walking through each room with fresh eyes — or asking an occupational therapist for a home assessment — can surface hazards and opportunities you'd otherwise overlook. Proactive planning allows you to phase modifications over time and budget for them thoughtfully, rather than scrambling after an injury or diagnosis.
Seven Modifications That Make a Real Difference
When Permits and Professionals Matter
Some aging-in-place modifications — particularly structural changes like widening doorways or adding ramps — may require a building permit depending on your local jurisdiction. Unpermitted work can create complications when selling your home or filing an insurance claim. Always check with your local building or planning department before beginning structural modifications, and don't hesitate to consult a licensed contractor for work that involves load-bearing walls, electrical systems, or plumbing.
Install grab bars in bathrooms
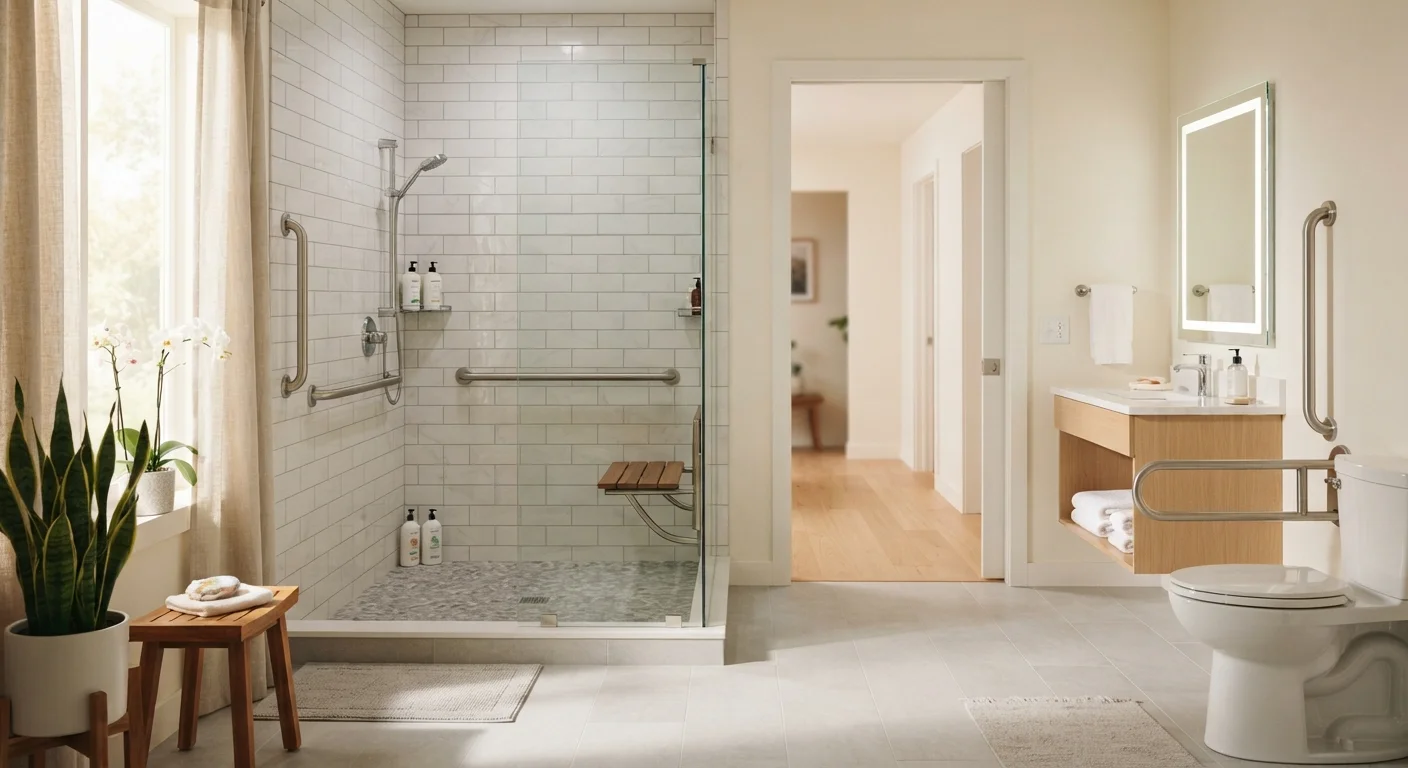
Bathrooms are statistically the most common location for falls in the home. Grab bars beside the toilet and inside or adjacent to the shower provide critical support during the moments of greatest vulnerability — stepping over a tub ledge or rising from a seated position.
Modern grab bars are available in finishes that blend with standard bath fixtures, so they don't need to look clinical. What matters most is proper installation: bars must be anchored into wall studs or blocking, not just drywall. A poorly secured bar can fail under load and cause more harm than having none at all. If you're uncertain about your wall construction, consult a handyperson or contractor before drilling.
Grab bars must be anchored into studs — a bar that pulls free under load is worse than none.
Switch to lever-style door handles and faucets
Round knobs require a gripping and twisting motion that becomes difficult with arthritis, reduced hand strength, or limited dexterity. Lever-style door handles and single-lever faucets are operable with a closed fist or forearm — a meaningful difference for daily comfort.
This is one of the most budget-friendly modifications on the list. Lever handles are widely available at hardware stores, and swapping them out is a straightforward DIY task that requires only a screwdriver for most interior doors. Consider replacing knobs throughout the home, not just in primary living areas, so the benefit extends everywhere.
Lever handles can be operated with a closed fist — an easy swap that pays off daily.
Add non-slip flooring and stair treatments
Smooth hardwood, polished tile, and even some vinyl surfaces become slip hazards — particularly when wet or in low light. Non-slip area rugs with rubber backing, adhesive stair treads, and anti-slip bath mats address the most common danger zones without major renovation.
For a more permanent solution, textured tile or non-slip strips applied to hard flooring can reduce risk significantly. On stairs, consider contrasting-color nosing strips that make each step's edge visually distinct. Remove any throw rugs that curl at the edges or slide on hardwood — these are among the most common tripping hazards in older homes.
Curling or sliding throw rugs are among the most common — and most easily removed — tripping hazards.
Improve lighting throughout the home
Vision changes with age, and what feels adequately lit at 40 may be genuinely insufficient at 70. Stairways, hallways, and bathrooms benefit most from brighter, even lighting. Motion-activated night lights plugged into outlets along nighttime paths — from bedroom to bathroom — can prevent falls during low-light hours without requiring any wiring changes.
For switched fixtures, replacing bulbs with higher-lumen LEDs is an immediate improvement. Rocker-style light switches with illuminated surrounds are also easier to locate in the dark than standard toggle switches and are a simple DIY upgrade for most homeowners.
Motion-activated night lights along nighttime paths are one of the simplest, lowest-cost safety upgrades available.
Widen doorways for wheelchair and walker access
Standard interior door openings are typically 28–30 inches wide — too narrow for a standard wheelchair (which requires at least 32–36 inches of clear passage). If mobility aids are currently used or anticipated, widening key doorways — particularly to the bathroom and primary bedroom — can make a significant difference in independence.
This is a structural modification that typically involves removing the existing door frame, cutting into the wall framing, and reinstalling. In many jurisdictions, this type of work may require a building permit, and load-bearing walls require particular care. This is a project where knowing when to hire a contractor versus tackling it yourself matters — professional assessment is worth the cost here.
Standard doorways are often too narrow for wheelchairs; widening key passages is a high-impact structural upgrade.
Consider a roll-in or walk-in shower conversion
Traditional tub-shower combinations present a significant barrier: stepping over the tub ledge requires balance, leg strength, and coordination that can diminish over time. A curbless (zero-threshold) or low-threshold walk-in shower eliminates this hazard entirely and is generally easier to use with a shower bench or wheelchair.
This is a more involved renovation — typically requiring tile work, waterproofing, and potentially plumbing adjustments. For a full scope comparison of bathroom upgrade approaches, see our guide on bathroom remodel versus addition. A handheld showerhead on an adjustable slide bar is an affordable complement to any shower setup and works for seated or standing use.
A curbless walk-in shower eliminates the most dangerous bathroom obstacle — the tub ledge step-over.
Create a step-free entryway
Even a single exterior step can become a significant barrier for someone using a walker or wheelchair. A permanent or modular threshold ramp at the primary entry point — and ideally at one secondary exit — extends usable access considerably. Modular aluminum ramps are adjustable and can be installed without permanent construction in many cases.
For homes with more significant grade changes, a longer ramp or graded pathway may be more appropriate. The general guideline used in accessibility planning is one inch of rise per foot of ramp run, which means a 6-inch step requires approximately six feet of ramp. Check with your local building department about permit requirements for permanent ramp installations, as rules vary by municipality.
A single exterior step can become a full barrier — ramps restore access without requiring major construction.
Building a Safer Home, One Step at a Time
No single modification transforms a home overnight, but a series of targeted improvements — starting with the highest-risk areas like bathrooms and entryways — can meaningfully reduce fall risk and extend comfortable, independent living. Many of these changes also benefit all household members, not just those with changing mobility: better lighting, lever handles, and slip-resistant flooring make daily life easier for everyone.
For homeowners managing a wider set of home care priorities, routine maintenance tasks that often get overlooked are worth reviewing alongside accessibility upgrades — both contribute to a home that functions safely over the long term. Address what you can now, plan for what comes next, and consult qualified professionals when the work calls for it.